
1. Setting up the working environment
To set up your working environment:
- Register for an EBRAINS account, login, and set up a private collab.
- Initialise the Bucket by clicking on Bucket in the navigation panel -> Create Bucket.
- Remember to set your data proxy bucket to "public". Your collab can still be private.
- Give users Admin, Editor or Viewer rights by clicking Team in the navigation panel.
- Install DeepZoom, WebAlign, WebWarp, LocaliZoom, and Meshview from the EBRAINS Collaboratory App Store (see instructions below)

How to install Collaboratory Apps
- To install Collaboratory Apps, click on the + Create button (top right corner).
- Give the page a Title (for example, DeepZoom), select the Community App option, and click Create.
- Select the App to install (for example, DeepZoom), and click Save and View.
- Repeat this for all the relevant Community Apps. You will need, "DeepZoom"; "WebAlign"; "WebWarp"; "LocaliZoom" and "MeshView".
- Navigate between the Apps in the navigation panel. File transfer between the Apps is through the Bucket.

How to prepare your images?
1. Prepare your images before upload by naming them according this naming convention:
The ID should be unique to the particular brain section and in the format sXXX, with XXX representing the section number. The section number should reflect the serial order and spacing of the sections (e.g., s002, s006, s010 for every 4th section starting with section 2).
Example: tg2345_MMSH_s001.tif
- Upload the images you want to work with into the bucket of your collab using the Data proxy (press on "Bucket")
2. Image ingestion
Open the DeepZoom app and login with your EBRAINS credentials.

Select your bucket, the one where your images are stored.
Select the appropriate folder and click "Browse source" in order to visualise the images to ingest.
Enter the URL of the bucket by typing "/bucket_name/output_folder_name"
Press "Start process".
By refreshing the status, you will see when the ingestion is completed.
You now will have pyramid files in DZI format in your output folder. These can be opened by the WebAlign app.

How to use WebAlign
WebAlign is an online tool for spatial registration of histological section images from rodent brains to reference 3D atlases. Different experimental datasets registered to the same reference atlas allows you to spatially integrate, analyse and navigate these datasets within a standardised coordinate system. The output of WebAlign can be used for analysis in the online QUINT workflow.
Online user manual: https://webalign.readthedocs.io/en/latest/
The view can be magnified using the 4-arrow "X" symbol in the top-right corner.
Opening a sample dataset
Demo dataset is loaded using the file: demo_mouse_data_start.waln
You can see the result of a finished anchoring by choosing the file: demo_mouse_data.waln
Opening a private dataset
After you have uploaded your images to the bucket and ingested your images with the DeepZoom app, this has generated DZIP chunks. These DZIP files are used by WebAlign.
1. Start a new registration by pressing "create new series", the UI will ask you for the name of the collab where DZI chunks are stored. E.g. my-collab-name
2. WebAlign will search for DZIP files and list those found.
3. Enter a name for the descriptor json file which will be created and will contain your anchoring information.
4. Choose the target 3D reference atlas (WHSv3 for Rat and CCFv3_2017 for Mouse).
5. Press "create". The main window will now display WebAlign. This step can take some time.

Opening an EBRAINS dataset
If you would like to work with an EBRAINS dataset, fetch the LocaliZoom link from the KG dataset card ( https://search.kg.ebrains.eu )and paste it in the "Import LocaliZoom link" tab.
These series already have been registered to a reference atlas, so this gives you a starting point. The linear registrations obtained with WebAlign can be refined using WebWarp.
Registration instructions
Short keys
| To do this | Press | Description |
|---|---|---|
| Place marker | Space bar | Markers are the anchor points of most transformations (stretch and rotate). |
| Remove marker | Esc | Removes a previously placed marker. |
| Horizontal stretch from marker | Left/Right arrow keys | Marker becomes a vertical line, and mouse drag horizontally resizes the cut. |
| Vertical stretch from marker | Up/Down arrow keys | Marker becomes a horizontal line, and mouse drag vertically resizes the cut |
| Rotate around marker | PgUp/PgDown | Marker becomes a cross with a surrounding arc, and mouse drag rotates the cut. |
| In plane adjust | Click + drag | If there is no marker, or the marker is a cross, mouse drag slides the cut in its plane (translation). |
Start the registration
The main window shows the selected image with the atlas overlay.
-If necessary, change the atlas from coronal view to sagittal or horizontal view (see Navigation panel below)
1. Move the atlas to the approximate position of your section using the yellow dots in the three small windows from the navigation panel.
2. Start anchoring by placing a marker with the "Space bar" , it is initially a cross, and it is the fix point of (most) transformations. The "Escape key" can be used to remove the marker.
3. The main window supports mouse drag in multiple modes in order to stretch the atlas and find the correct position.
-If there is no marker, or the marker is a cross, mouse drag slides the cut in its plane (translation).
-Keyboard controls to modify mouse drag (they also place the marker if it's not placed already):
-Left/Right arrow keys: marker becomes a vertical line, and mouse drag horizontally resizes the cut
-Up/Down arrow keys: marker becomes a horizontal line, and mouse drag vertically resizes the cut
-PgUp/PgDown keys: marker becomes a cross with a surrounding arc, and mouse drag rotates the cut. This may look weird because the cut remains being a rectangle, and when the horizontal and vertical physical resolutions (like pixels/mm) of the image do not match, atlas cut will appear stretching/shrinking with the rotation.
After each transformation step, marker resets to a cross (translation mode).
Note! The panel can be resized towards the left (common border with Control Panel) and towards the bottom (common border with Filmstrip).
4. Save the position by pressing "Store". The registration is copied to the remaining slides to help with scaling (visible also in the filmstrip)
5. Go through all sections and refine position and cutting angles.
Note! When jumping from one section to the other, wait a few seconds for the image to load
Note! The "restore" button allows you to go back to the saved position if necessary
6. Save your results in the descriptor file (json) by pressing "Save to bucket".
7. When the registration is finished, you can export your descriptor files ( .flat files used for analysis in the QUINT workflow) by pressing "export overlays".
Control panel:
| Button | Function |
|---|---|
| Store | Store the current alignment and propagate to unaligned sections (Note this does not save the series to your bucket) |
| Restore | Reset the current alignment to the last stored position |
| Clear | Reset the current alignment to the default position |
| Overlay Slider | Opacity of the atlas overlay, when fully opaque, it becomes an outline |
| Overlay color | The outline color |
| Filmstrip slider and color | The above settings, applied to the filmstrip |
| Save to bucket | Save the series to your bucket (and overwrite the existing file) |
| Export overlays | Generates a series of .flat files (for Nutil or similar utility), and stores them into a .zip file in the bucket (re-using the name of the series descriptor, e.g. series13.json will export series13.zip) |
The right border of the control panel can be dragged horizontally, allowing to resize the panel and the main view
Filmstrip:
Drag horizontally to see series, click on a section in order to load it into the main view The top border of the filmstrip can be dragged vertically, allowing to resize the panel and the main view
Navigation panel:
Shows the three standard planes centered around the midpoint of the current alignment visible in the main view.
The rectangle of the current cut is projected on each standard plane as a yellow line/rectangle/parallelogram. A small yellow circle represents the midpoint of the projection.
Drag the midpoint around to move the cut.
Drag anywhere else to rotate the cut (inside the given standard plane, around the midpoint).
How to use WebWarp
WebWarp is an online tool for nonlinear refinement of spatial registration of histological section images from rodent brains to reference 3D atlases. Webwarp is compatible with registration performed with the WebAlign tool. Different experimental datasets registered to the same reference atlas allows you to spatially integrate, analyse and navigate these datasets within a standardised coordinate system.
Online user manual: https://webwarp.readthedocs.io/en/latest/
The view can be magnified using the 4-arrow "X" symbol in the top-right corner.
Opening a sample dataset
Demo dataset is loaded using the file: demo_mouse_data.waln
You can see the result of a finished anchoring by choosing the file: demo_mouse_data.wwrp
Opening a private dataset
All the .waln files located in the Bucket are displayed on the WebWarp main page. Your progress in WebWarp is saved as a .wwrp file.
Opening an EBRAINS dataset
If you would like to work with an EBRAINS dataset, open the LocaliZoom link from the KG dataset card ( https://search.kg.ebrains.eu) and paste it in the "Import LocaliZoom link" tab in WebAlign. Save this series as a .waln file you then can open in WebWarp.
Non-linear registration
- Navigate to the WebWarp app in the left-hand panel: all the .waln files located in the Bucket are displayed on the WebWarp main page.
- Select the waln file corresponding to your result from the WebAlign image registration.
- Wait for the images to load: this may take some time.
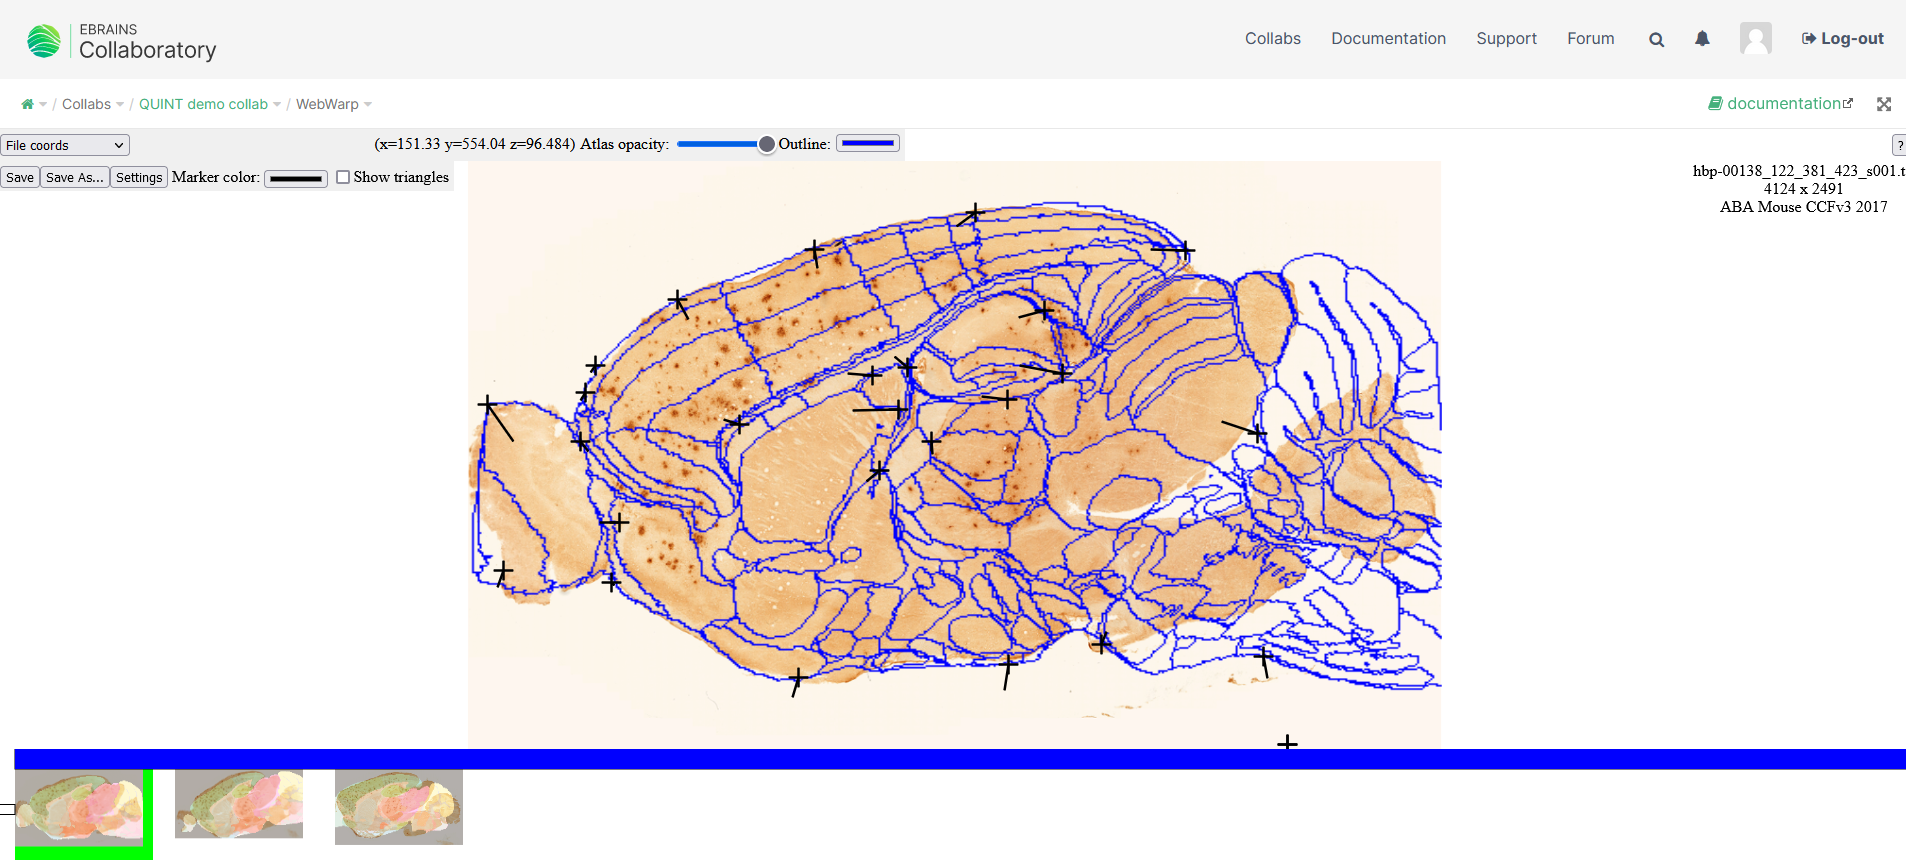
Your registered images are visible in the main window. The atlas regions with transparency sliders can be toggled using the “Atlas opacity” button. The color of the atlas outline can be modified by clicking on the colored rectangle.
4. When going to “Settings”, the button for selecting the marker color will appear as well as “show triangles” which correspond to areas affected by the same transformation.
5. Place a marker on an area you want to stretch using the space bar. Nonlinear distortions are applied by dragging a marker using the mouse.
6. Press Delete or Backspace to remove a marker under the mouse cursor.
7. Save your results pression the “save” button. “Save as” will allow you to save the adjustments as a new file with a different name.
8. When the registration is finished, you can export your descriptor files ( .seg files used for analysis in the QUINT workflow) by pressing “export overlays”. All results are zipped and stored in the bucket. The result file name will be the same as the one chosen to create the registration, e.g. “my-registration.zip”.
How to use LocaliZoom
LocaliZoom is a web application for viewing of series of high-resolution 2D images that have been anchored to reference atlases. LocaliZoom allows the viewing and exploring of high-resolution images with superimposed atlas overlays, and the extraction of coordinates of annotated points within those images for viewing in 3D brain atlas space.
Online Manual: https://localizoom.readthedocs.io/en/latest/
The view can be magnified using the 4-arrow "X" symbol in the top-right corner.
Opening a sample dataset
A demo dataset is loaded using the file: demo_mouse_data_lz
Opening a private or EBRAINS dataset
LocaliZoom will open all WebAlign (.waln) or WebWarp (.wwrp) files.
Create annotation points
To extract a coordinate, the mouse marker must be positioned at the desired location, and press the space bar. A cross will appear in the selected colour (under Settings), representing the location of the extracted coordinate. After all desired points have been marked, the coordinates can be exported either to Excel.
Press "delete" in order to remove an annotation.
Save your annotations with the "save" or "save as" buttons. The file format is .lz
Export of coordinate points
The created points can be exported to an Excel book by pressing "XLSX export".
The saved .lz file can also be visualised in the 3D viewer, MeshView.
How to use MeshView
MeshView is a web application for real-time 3D display of surface mesh data representing structural parcellations from volumetric atlases, and point clouds extracted from datasets.
Online manual: https://meshview-for-brain-atlases.readthedocs.io/en/latest
The view can be magnified using the 4-arrow "X" symbol in the top-right corner.
Open point cloud files
MeshView can open annotations from LocaliZoom (.lz files). Possibility of a global control of all structures, using the slider will render the meshes transparent or disappear.
The individual control allow each structure to be made transparent or disappear. The color for each structure can be changed when clicking on the colored square.
Navigation in the hierarchy is possible by clicking on the region names (grey boxes), this will collapse parts of the region tree.
Export images
The "screenshot" button allows to capture the main window view as a png file.
